
Before diving into the step-by-step guide on how to upload your Virtual Tour source HTML to your hosting server, CAV Studio would like to introduce this service and its value for real-estate developers.
Virtual Tour is one of the strongest developing trends in the field of architectural and real estate visualization today. With the ability to allow viewers to experience the space in a 360° interactive form, Virtual Tour brings a realistic perspective, helping customers fully visualize the project before construction or before deciding to transact.
You can see Virtual Tour samples here: Virtual Tour Portfolio
Advantages of uploading Virtual Tours on your website
1. Faster Load Times and Better Visibility
Hosting your website pages directly on your hosting server often results in faster load times and improved visibility. When pages are served directly from your server, they load quickly, offering a more responsive experience. This is especially important for keeping visitors engaged and improving your search engine rankings.
2. More Flexibility and Control
Uploading your source HTML gives you greater control over your website’s design and features. You can easily make updates, add new functionalities, and adapt your site to changing business needs without relying on a developer for every change.
3. Enhanced Security and Compliance
Hosting the source HTML yourself allows you to manage security protocols more precisely. This is crucial for industry-specific compliance, enabling you to meet your security standards effectively.
4. Better SEO and Performance Optimization
With direct control over your HTML, you can fine-tune your site for search engine optimization (SEO) and performance. This helps improve your search rankings and ensures a smooth user experience.
5. Easier Integration with Existing Systems
If you have existing systems, databases, or third-party integrations, uploading the source HTML directly to your hosting platform makes incorporating these elements simpler.
6. Less Dependence on External Services
Hosting your pages on your own server reduces reliance on third-party embed codes and external services, minimizing risks related to downtime or performance issues.
Tutorial: Uploading Source HTML to Your Hosting Website
Now, let’s go through the steps to upload your virtual tour’s source HTML to your hosting system.
Prerequisites:
- Source HTML file for the virtual tour ready for deployment (this will be provided in full upon project completion)
- Access credentials for your hosting server (check with your hosting provider)
Step-by-step uploading source HTML to your hosting website:
1. Connect to the Hosting Server:
Use FTP (File Transfer Protocol) or SFTP (Secure File Transfer Protocol) to connect. Popular tools include FileZilla, Cyberduck, or others.
In this guide, we use FileZilla for demonstration.
-
Link to download FileZilla software here.
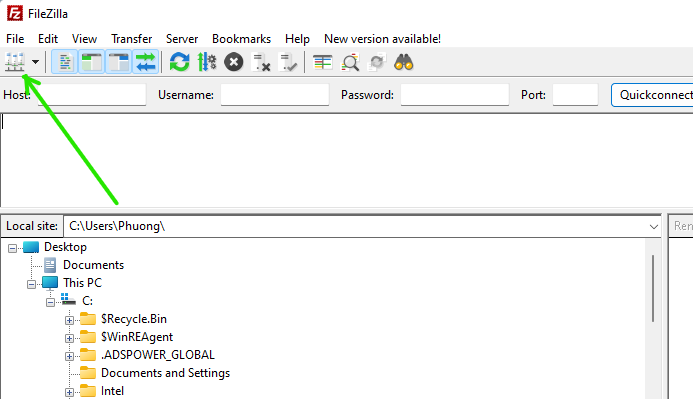
After downloading and installing FileZilla software on your computer, open the software and click on the icon as shown below.
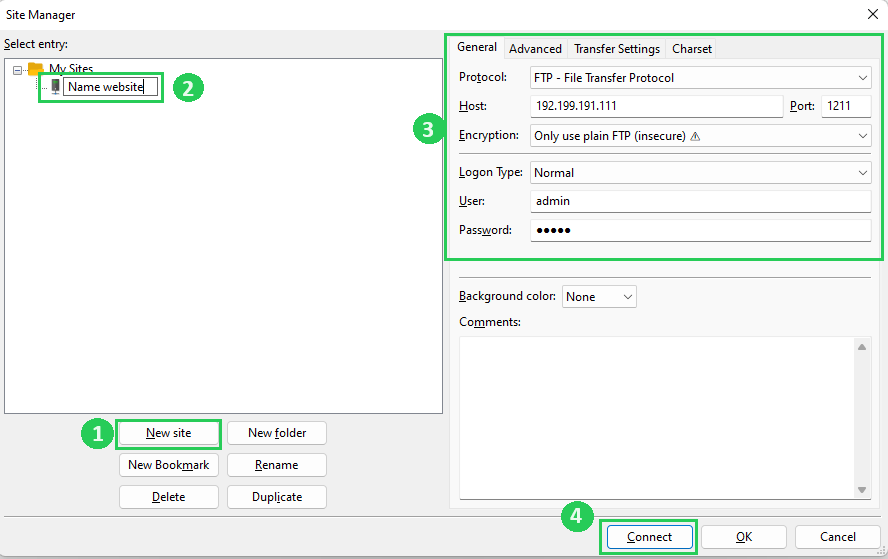
Next, create a new connection by clicking New site > enter your website name > enter the login information to your hosting server from your provider > Finally, click Connect to complete the connection to the system website hosting.
Note: In the "Encryption" section, please switch to "Only use plain FTP (insecure)".
2. Navigate to the Web Root Directory:
Locate the web root directory on the hosting server. This is the main folder where the website files are stored. It's often named "public_html" or "www.".
If you connect your website hosting using FileZilla, the root directory of the website will be in the "Remote site" area.

3. Upload Source HTML Files:
Copy your source HTML files of virtual tours (These files are provided by CAV Studio) and upload them to the web root directory. Ensure that you maintain the correct folder structure if your website has multiple pages or assets.
Note: You need to choose the correct directory structure and table of contents structure for your website to upload the source HTML of the virtual tour file to the right place you want. The common website path structure is: "website_name/folder_path/index.html".
When you use FileZilla, navigate to where you saved your HTML source on your computer, select ALL --> Right-click --> and select Upload to upload them to your website hosting.
.png)
4. Test the Website:
Open a web browser and navigate to your domain. Test the website thoroughly to ensure all pages load correctly and functionality is as expected.
Note:
- Before making any changes, always create backups. If you use version control (e.g., Git, Server local), commit your changes to the repository.
- Keep thorough documentation of the changes made, including any configurations or settings adjusted during the upload process. This documentation is valuable for future updates or troubleshooting.
Following the steps, you'll successfully upload your source HTML of the virtual tour to your website, providing you with a customized and controlled web presence.
Conclusion
This article has guided you through the entire process of uploading and activating a Virtual Tour using HTML source directly on your hosting website.
If there is any unclear part, do not hesitate to contact CAV Studio for support.


